
 SOLO-Paint is not under tips but will go by searching on your own lesson.
For me the first thing I need to have is the painting easel.
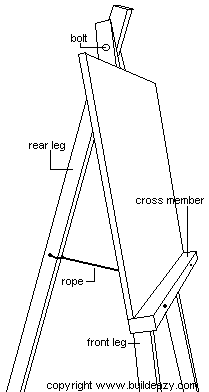
The beside photo is what I mean now!
So i will so you how to make an easy painting easel.
Material :-
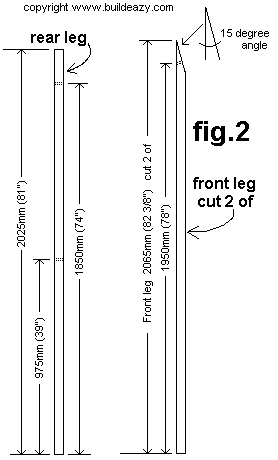
- 75x50 (2x3) lumber - 2 pieces at 2065mm (82 3/8") and 1 piece at 2025mm (81").
- 100x50 (2x4) lumber - 1 piece at 1200mm (4ft).
- 18mm (3/4") plywood - 1 piece 1200x825 (48"x 33")
- 10mm (3/8") carriage bolts - 2 at 170mm (7") and 1 at 125mm (5").
- A hand full of 60mm (2 1/2") nails and a bit of wood glue.
- Note: If 75x50 (2x3) stock can't be obtained, it can be ripped out of 150x50 (2x6) stock.
- It can also be replaced by 50x50 (2x2) stock for a flimsier version or 100x50 (2x4) stock for a sturdier version.
- Use treated lumber, galvanized bolts and galvanized nails if the easel is to be used and left outside.
__________________________________________________________________________________
 Instructions :- Step 1. Cut the members Cut the two front legs 2065mm (82 3/8") long. Angle cut the tops 15° as shown in the drawing. Measure 1950mm (78") up from the bottom of both front legs and drill a 10mm (3/8") hole through the face (widest) side at right angles to the angle cut. See fig.2. Cut the rear leg 2025mm (81") long. Drill two 10mm (3/8") holes through the face (widest) side, one up 975 (39") from the bottom and the other up 1850mm (74"). Cut the horizontal cross member 1200mm (4ft) long. Cut the 18mm (3/4") plywood backing board 1200 (48") long x 825 (33") wide. |
 Step 2. Leg assembly Step 2. Leg assembly Lay the three legs on the ground with the rear leg in the middle. Line up the holes in the tops of the legs. Put a bolt through the holes and loosely place a washer and nut on the end of the bolt. Spread the two front legs at the bottom until they are 1125mm (45") apart. See fig.1. Tighten the nut. Step 3. Complete assembly With the leg assembly still lying on the ground, and with the tops of the legs bolted together and the bottoms spread apart 1125mm (45"), then center and drill and bolt the horizontal cross member to the front legs 950mm (38") up from the bottom of each front leg. See fig.1. Glue and nail the plywood backing board to the front legs positioned as shown in fig.1. Ensure that there is glue between the bottom edge of the backing board and the horizontal cross member. Step 4. Stand and tie Stand the easel upright and arrange (spread) the legs until the easel is at a convenient angle. Add a rope to stop the easel from spreading any further apart. Thread one end of the rope through the hole in the rear leg and tie off. Tie the other end of the rope to an eye screw fixed to the back of the cross member. That's it! Go and paint. _____________________________________________________________________________________________ |
No comments:
Post a Comment